
Following on from my exciting award nomination announcement (here), I’d like to share a wee project that I’ve been thinking about for a while; A DIY vase makeover.

I bought these vases a few years ago, with a plan to simply spray painting them to match my decor. I bought them because I loved the shape of each vase, and knew that their smooth surfaces would lend themselves well to a nice even painted finish.
And then I did nothing with them. Until now.
I found them in a box in the attic recently, and realised that they were both still very ‘me’ and that I really should pull my finger out and do something with them. So I did.
And here is exactly what I did, in case you want to do it too.
What You’ll need;

Spray Primer (to help adhesion of the paint to the vase)
Spray Paint (to provide a smooth base coat, in the colour of your choice).
Emulsion paint (this will be used to cover up the base colour. Choose two or more for best effect).
Paint brushes
Water sprayer
Jar of water
Mixing bowls
Kitchen roll
I also used an old sheet of card to rest the vase on.
DIY Vase Makeover;
1. To begin, clean your vase with soapy water, to get rid of any dirt, grease and sticky marks.
2. A light coat of spray primer, followed by another, then another…to ensure that an even base is achieved.

3. Use the same technique as above, to build up your base colour of spray paint.

4. Take a blob of emulsion and place it in your mixing bowl. Add a little water to dilute. Now slop it on. Be patchy, be messy, but don’t be neat.

5. Now spray with water lightly, until the watery paint runs and bleeds, then leave to dry.
6. Repeat.
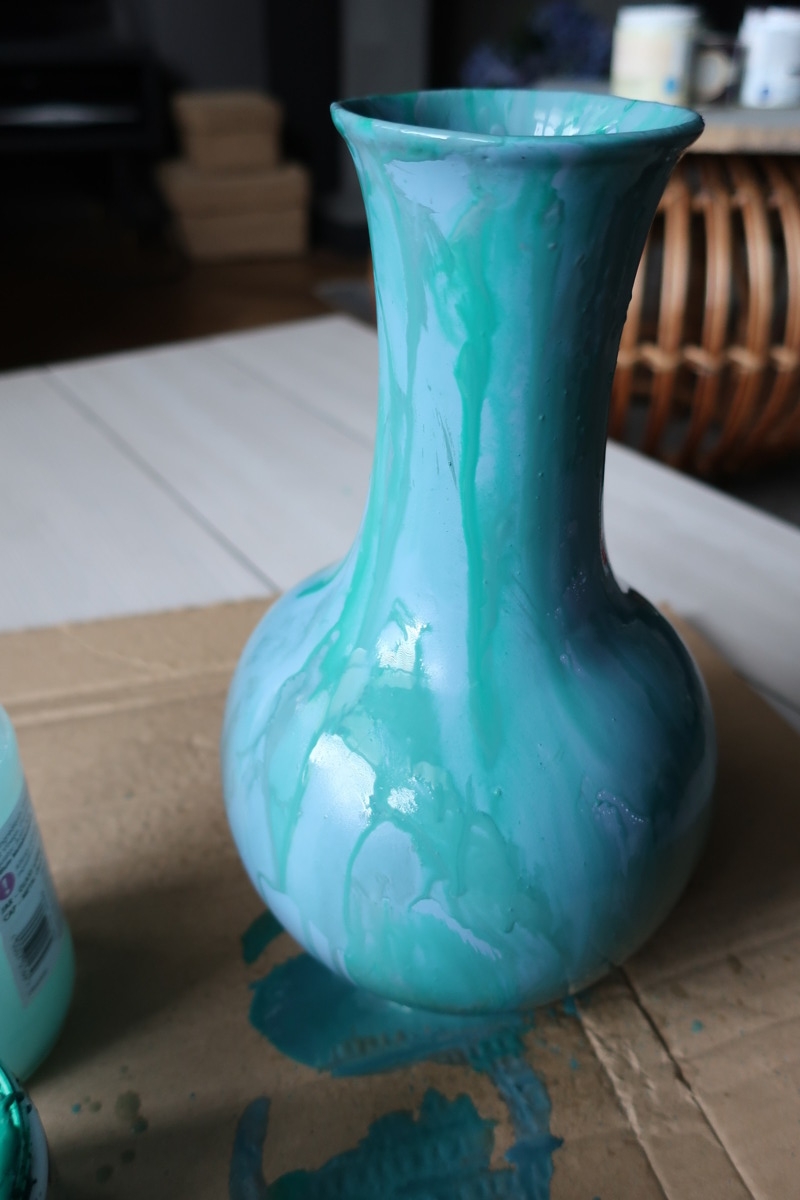
7. Repeat with second (top) colour, leaving to dry (or forcing with a hairdryer, if like me, you’re impatient!) until happy.


8. Once completely dry, seal with matt acrylic sealer, or buff with wax and a cloth. (I did the latter, which works really well.

I did two vases, both using spray paint that I already had and leftover tester pots. This project is very simple to do and really requires no skill. The trick is in building up enough thin layers so as not to create a ‘blobby’ texture, and to give depth of colour. Tiny bits of the base peek through, which works really well with metallics or a contrasting colour palette.


Tips To Stop You Buggering It Up;
Top Tip 1; Ensure that the vases you buy either have no texture, or a texture that you want to work with, not hide. Your finished vase will look pretty shit if it looks like you’re hiding something!
Top Tip 2; Have patience (or in my case, use the slow setting on the hairdryer). Patience (or the slow setting) will allow the paint to run and dry naturally, giving the nicest effects.
Top Tip 3; A good few coats of a gloss acrylic sealer (it has to be acrylic or the paint will bubble and lift. I know from experience!) would give this a very convincing glaze look.
This DIY Vase Makeover may not be to everybody’s taste, but with the right colour combinations, this could work for anyone.
Go on, Give it a go.

Wow…thanks very much for this tutorial. I love the effects and using my favorite shades of teal.The finished product is beautiful and reminds me of pottery by 1960’s Hungarian potter, Gorka. My grandmother had sent us several of his vases long ago and I am thinking of creating a few of these faux one to slip into the display on my shelves.
How fantastic! I love that it will ‘nestle’ amongst the real thing! It was a really fun project that I’m planning to carry through to another couple of junk shop finds. 🙂
Wow Malcolm, your vase makeovers look amazing! People pay a lot of money to buy vases that look like what you’ve created! You’re so clever 🙂
Aw thank you so much Meera! I’m pretty pleased with how they’ve turned out. It was quite fun to do too! 😀
I love the end effect! Great job!
Thank you so much Medina! 🙂